Facebook is by far the top advertising platform for any digital marketer.
Their offering includes vast targeting capabilities, granular audience segmentation, catchy ad placements, and much more. When combined correctly, it can deliver amazing results for your company, such as increasing website traffic and driving conversions.
One of Facebook’s key elements of success has been its users’ willingness to voluntarily release all sorts of personal information. Multiply that by billion of people globally and you have the richest database in the world.
Facebook is currently the second largest community in the world after Christianity.
Facebook has grown to such extent that it is currently the second largest community in the world after Christianity (see chart below), surpassing Islam and China in size, as Scott Galloway points out in his annual letter from Planet Earth.
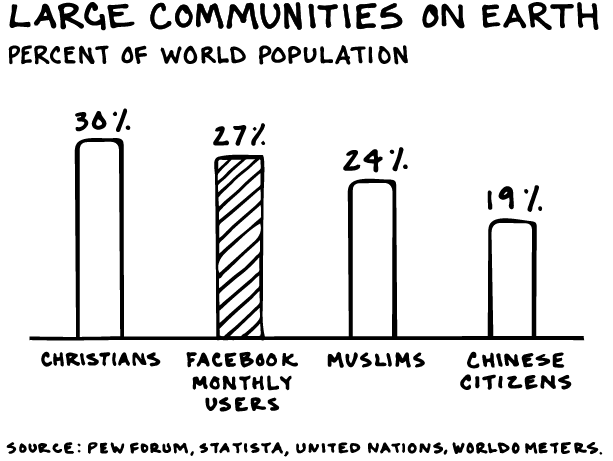
The consequence of becoming almost as popular as Jesus led to the implementation of their own version of tithe. In other words, organic posts started to appear less frequently on user’s feeds, forcing companies to pay for ads to reach their audiences.
This simply means that your company has no choice but to advertise on Facebook, but don’t panic, we’ve put together a comprehensive guide to make killer ads to increase traffic to your website.
The following sections will be covered:
Starting a Campaign
Let’s start by going to your Facebook Ads Manager (if you are using Business Manager, you will need to go to your dashboard, and select the correct Ad Account) and click on Create Ad on the top right corner.
Facebook Ads are conveniently organized in 3 levels from broad to specific: Campaigns > Ad Sets > Ads.
- Campaigns: where you select your objective.
- Ad Sets: where you define the target audience, placements, budgets, scheduling, etc.
- Ads: where you build the creatives to be used in each Ad Set.
Choosing Your Objective
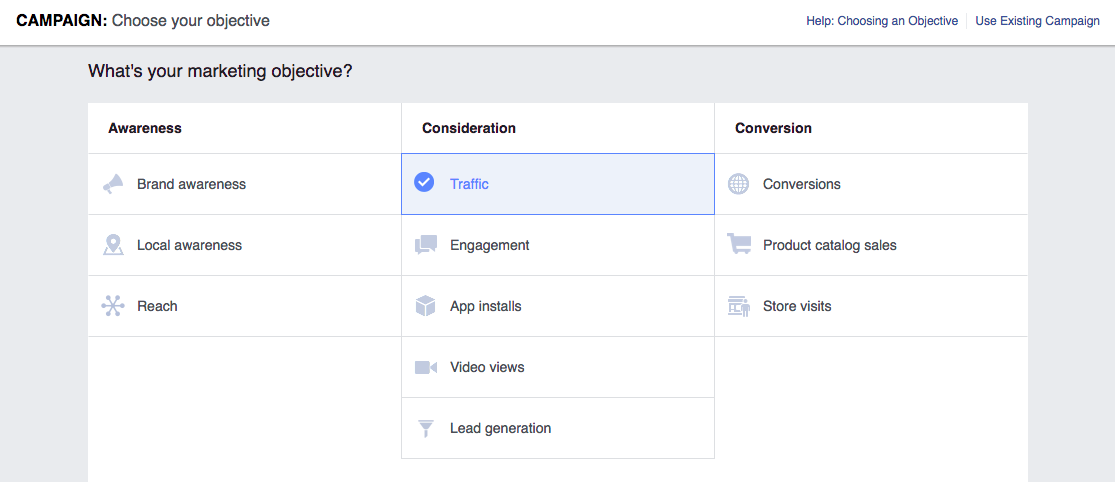
This is where you will have to choose your campaign’s objective by answering the following: do you want to create awareness, increase traffic, generate leads, drive conversions, or other?
This post is aimed at increasing traffic to your website, therefore, the objective we will select is Consideration > Traffic.
Facebook will offer you the possibility to split test the campaign, which means that you can compare results between different target groups. If this is one of your first campaigns, it’s always crucial to conduct A/B tests to find the most appropriate audience, which could lead to higher results and conversions for your business.
Lastly, choose a name for your campaign, trying to follow a naming system that will ensure that your future campaigns stay organized.
Creating an Ad Set
Start by giving a name to your ad set. You will then need to choose where you want to drive traffic to: website, app, messenger.
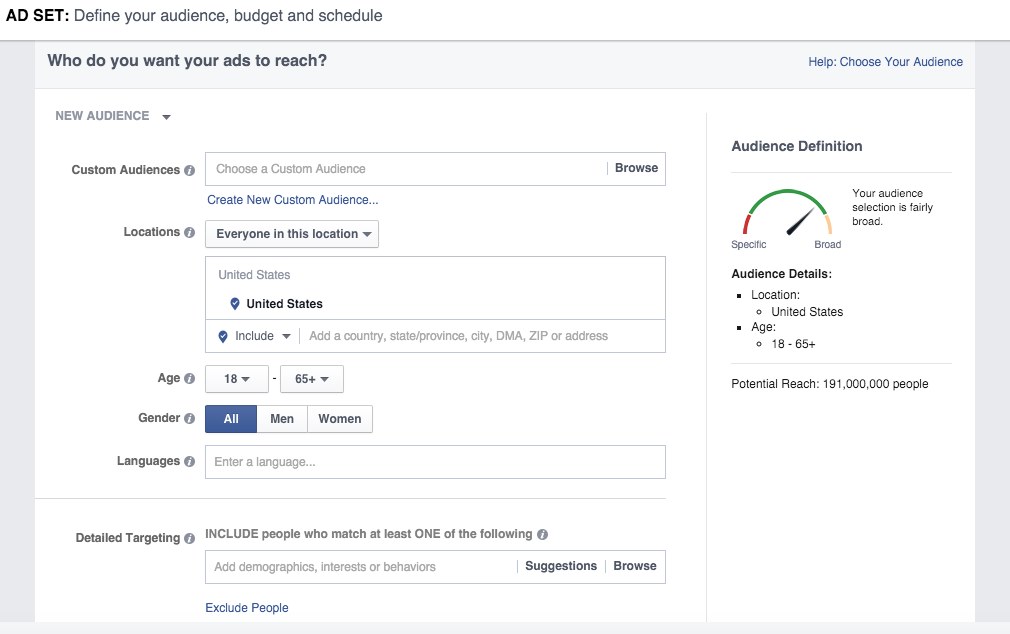
Next we will define the audience that you want to reach, by selecting characteristics such as location, age, gender, interests, etc. Note that you could also use any previously saved audiences.
Basic Demographics
- Locations: choose the geographic location of the people you want to reach (country, state, city, etc).
- Age and Gender: choose the basic demographics of the audience you want to reach.
- Language: make sure you select the language that matches your website’s language to avoid attracting the wrong audience.
Detailed Targeting
This is a very important field since it will allow you to narrow down your audience so as to find the people who could be potentially interested in your company’s products or services.
We recommend adding a minimum of 10 interests/behaviors that define your target audience – users will be targeted if they match at least ONE of the interests. The system will also suggest interests based on your choices.
- Interests: find people based on what they’re into, like hobbies, favorite entertainment and more.
- Behaviors: reach people based on their purchase behaviors, device usage and other activities.
We recommend adding a minimum of 10 interests or behaviors when defining your target audience.
The best way to know the size of your audience is by looking at the Potential Reach that is displayed on the right side of the page (below the gauge). If this number is too small, chances are you won’t be able to deliver, so always aim for a threshold of 100,000-1,000,000.
Placements
Choose where you would like your ads to show up. Remember that not all placements will deliver the best results for your campaign, therefore, it is best if you edit the placements and select the most appropriate ones based on your goals.
Facebook:
- Feeds: always recommended. Keep an eye on mobile results to ensure people are reaching your website.
- Instant Articles: recommended.
- In-Stream Videos: only eligible for video content.
- Right Column: recommended (desktop only).
- Suggested Videos: only eligible for video content.
Instagram:
- Feed: recommended.
- Stories: only recommended for highly visual or engaging content.
Audience Network: ads would appear on other mobile apps and websites that are part of the Facebook network. This option is only recommended if you want to reach very large audiences.
Messenger: ads would appear on the Messenger app. This option is only recommended when you want to start a direct conversation with your potential customers.
Budget & Schedule
This section is extremely important because it will let you define how much you would like to spend and when would your ads show up.
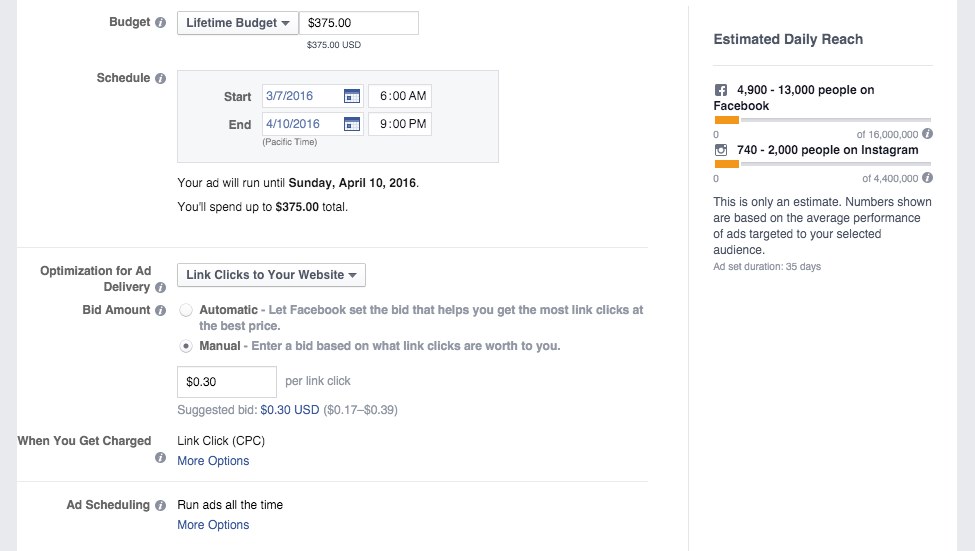
The first thing is to pick whether you will use “daily” or “lifetime” budgets. The former is a great choice for ongoing campaigns while the latter would give you more control if your campaign needs to follow specific flight times.
Schedule will let you select the start date and end date of your campaign. Make sure to run campaigns for at least 1-2 weeks to allow for optimization (this is done automatically through their algorithm).
Setting Your Bid
Facebook has multiple alternatives for optimizing ad delivery based on your campaign goals:
- Link Clicks: will get you more people clicking.
- Landing Page Views: will get you people clicking and waiting for the landing page to load (this one is our favorite).
- Impressions: will show your ads to as many people as possible without guaranteeing any clicks.
- Daily Ad Reach: will show your ads to people up to once a day.
You will then have to select between 2 bidding amount options: Automatic or Manual.
Automatic will let the platform choose the best CPC for your campaign and optimize the bid automatically based on performance. In simple terms, the more clicks your ad gets, the cheaper you’ll pay per click.
- Pros: the major benefit is that this method will likely deliver higher results for your campaign.
- Cons: the main downside is that, if your campaign doesn’t perform, you will likely spend a lot of money. We recommend that you click on Manual bid to see what is Facebook’s suggested bid threshold to ensure it aligns with your budget.
Manual will give you full control of how much you want to pay per click. You will need to ensure that your bid is within the suggested threshold (located below the bid field).
- Pros: you have full control of your costs by setting the maximum you want to spend per click.
- Cons: because Facebook is a programmatic ad exchange, bids are based on offer and demand, which could lead to choosing a low bid that’s not competitive (and ultimately getting no results).
We recommend selecting Landing Page Views and Automatic bidding for best results.
The final checkpoint to keep in mind is Estimated Daily Reach which can be found on the right side of the page. This will help you estimate how many people in average will be reached on a daily basis.
Building the Ads
Building successful ads is very important to, not only attract the right audience, but also deliver the right expectation to users clicking on them. The following section intends to shed a light on the best practices to build ads that deliver results. You can find inspiration from Facebook’s top ad creative.
Identity
You must first choose the Facebook page and/or Instagram account that you want to use to promote the ads. If your company owns multiple pages, pay extra attention so as to choose the right account.
Format
Choose the format that better adapts to your campaign:
- Carousel: useful to showcase various products.
- Single Image: the best option to promote one specific page on your website or a piece of content.
- Single Video: if you want to promote a video.
- Slideshow: creates a video that would feature up to 10 images.
Images
- Browse Library: let’s you find previously used images or upload thumbnails from your computer.
- Free Stock Images: let’s you choose free stock photos from a wide selection powered by Shutterstock.
We recommended that you use the original photo on the landing page (make sure to have one) and add at least 3 additional images that are cohesive. Split testing images will allow the audience to choose the one that they found more attractive.
Note that Facebook has many guidelines that you need to follow in order for your ads to get approved — like the amount of text on the image or avoiding nudity and explicit content.
Links
Destination URL: insert the landing page URL that you want people to visit. Note that you will be able to add UTM codes later in a dedicated field for that (called URL Parameters).
Ad Copy: this is where you will write the copy that will be feature in your ads so it’s important to get the creative juices flowing. The text fields can be broken down into the following sections.
- Headline: the text that shows up below the image. Here are some great tips for writing click-worthy headlines for your content.
- Text: the teaser that will be the first thing people will see as it is located above the image (max 90 characters). Note that this is the most important part of the ad copy, so you need to ensure that it creates interest and sets the right expectation.
- Call-to-Action: choose the button that best describes the action that needs to be taken by the user.
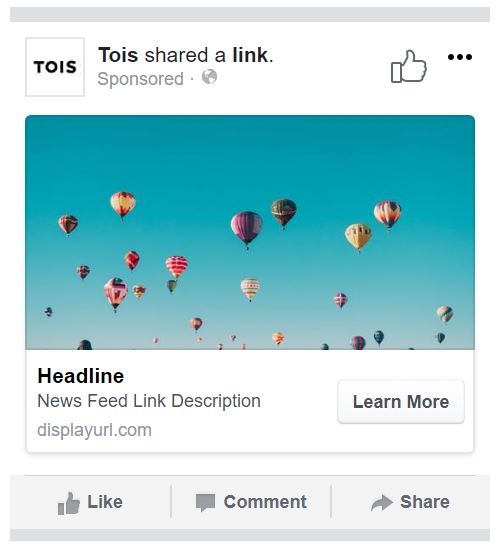
The teaser text is the most important part of the ad copy due to its prime position.
Show Advanced Options:
- News Feed Link Description: this field will auto-populate the first paragraph of your content. Feel free to customize it as needed.
- Display Link: you can personalize the way the link is displayed.
- URL Parameters: this is the field where you must add any query strings, like UTM codes, to accurately track users in Google Analytics. Remember that you don’t need to add the “?” in this field because it will break the code.
Finishing Up
Click “Confirm” once your ads are ready. Facebook will need to approve all of your ads before the campaign goes live (this could take up to 24 hours).
Do you need help with your Facebook ads? We can help you create successful campaigns to drive traffic and conversions. Contact Us to find out more about our services to grow your business.


One response
[…] to be high, since every publisher will want to have the scoop, so it is important to have a good distribution strategy in […]